Tips for learning to spot weave and handle 3 working yarn ends for the troika technique.
 The practice project for learning spot weaving is the Spot Woven Dishcloth (free pattern instructions available here).
To help you along and avoid pitfalls, here are questions posed by others that you might also have. I’ve also included tips I’ve found helpful in my own spot woven knitting.
Testing Colors
As with all knitting that uses different colors of yarn in the same item, you want to be sure that the colors are not going to bleed into each other.
For an easy way to test your yarn colors BEFORE you start knitting, see the tips & techniques article Check Your Thread Colors for Colorfastness that I posted for last year’s Mini Lace and Beaded Flag project.
Attaching Another End of Yarn
Heidi B asked “Jackie when you say in the instructions to ‘attach M’ what method would you use. When changing colors in regular knitting I usually tie an overhand knot of the new color around the strand I’m about to drop and push the knot up close and cut leaving a few inches. At the end I carefully untie the knots and weave in the tails. You don’t say anything about weaving in the ends, I’m probably missing something and none of this matters but I’d still like some hints on attaching if possible.“
You can use whatever method you prefer for temporarily attaching the yarn. I myself just leave enough of a tail to weave in later, and then start knitting. (Also see below about weaving in ends.)
Slipping Stitches WYIB and WYIF
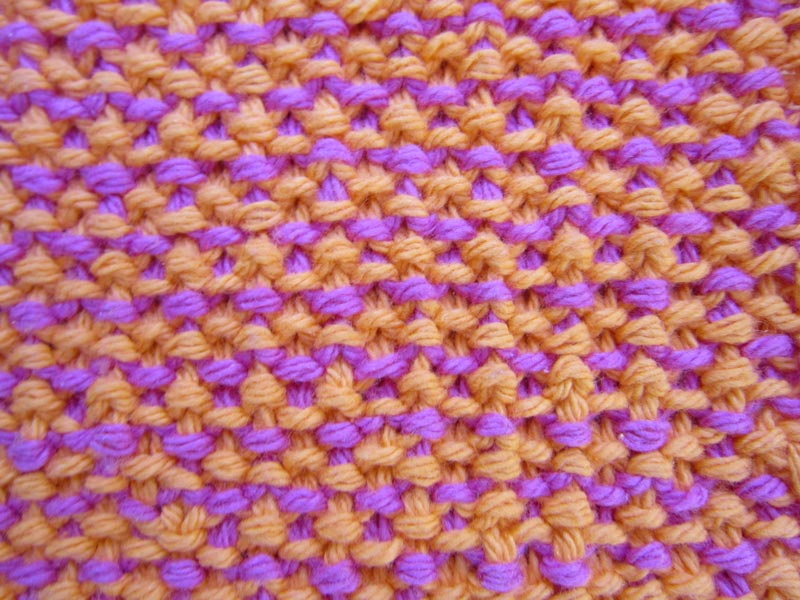
The Spot Woven stitch pattern is a fairly simple technique, but it does command some attention along the way. Like all slip-stitch patterns, you have to do twice as many rows to get the same vertical distance. So it can seem a bit tedious in the knitting. However, it’s a dense, firm fabric and does make a pretty design when you need something that is sturdy and less elastic than normal.
Pay close attention on each row as to whether you are supposed to slip stitches with yarn in front or with yarn in back.
Tandy R asked “I have not tried it yet, but I noticed that Row 1 uses wyib, but Row 3 uses wyif. Just reading the pattern, I would expect Row 1 to use wyif. Is it different because it is a set up row? Should I just trust you and follow along?“
Row 1 intentionally uses wyib because it is a setup. Good for you that you are reading carefully, because to get the spots it is important to pay attention to whether the yarn is in front or back when slipping stitches.
Tip: After you get past the set-up Row 1, here is another way to remember whether to slip with yarn in front or back … Other than the set-up Row 1, you will always be slipping the yarn so that it appears on the right side of the fabric.
Paying Attention to Tension
While paying attention to whether you are slipping yarn in front or back, also pay close attention to your tension. The goal is to achieve the same tension on your slipped stitches as on your regularly knitted and purled stitches.
If the tension is too tight, you will get puckering and the spots will start to disappear into the fabric. But don’t overdo the looseness of the tension either, as you will get loops and lose the sturdiness of the fabric.
Don’t obsess about the tension (mine isn’t perfect either, lol). Just be aware that if your spots are not showing up well or your fabric seems to be narrower than it should be, try to keep the tension sort of on the looser side, yet without getting the tension too loose that it gets loopy.
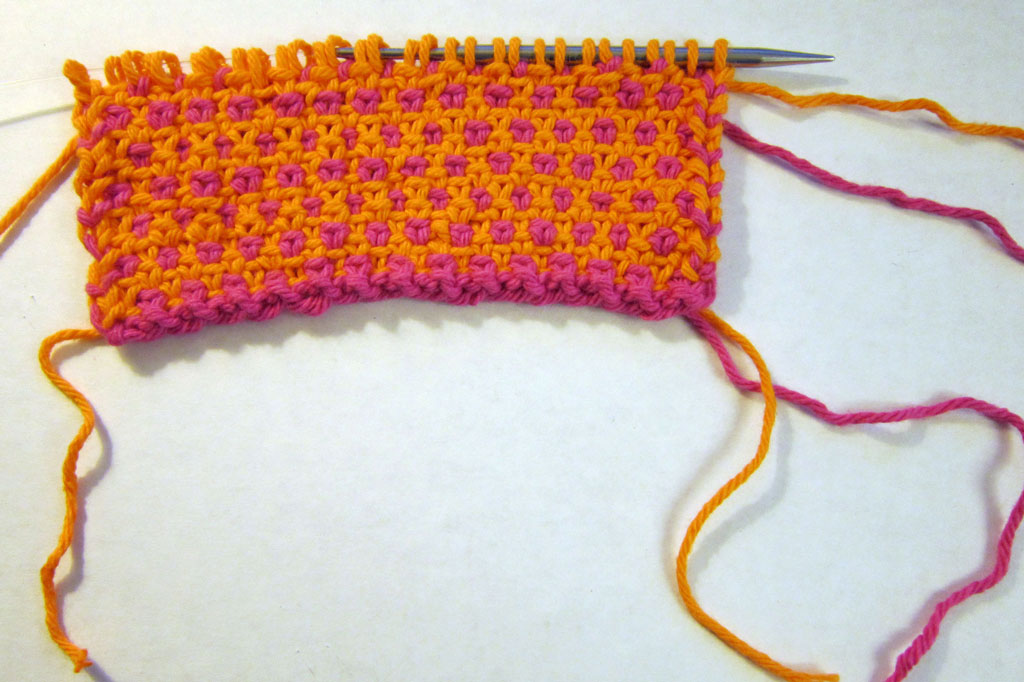
The Troika Technique of Alternating 3 Strands of Yarn
I borrowed the word “troika” from the original Russian, meaning a “set of three”. In the troika technique of sequencing through a set of 3 yarns, you will always be picking up the working yarn end waiting 2 rows below (i.e. the yarn end attached to your ball of yarn, rather than an end from your cast on or attached yarn).
Marilyn C wrote: “I am not good at looking at row patterned knitting and knowing what to do. I get it for cast on with A, Row 1 knit with M, Row 2 knit with other end of M.
But for Rows 3 and 4 … ‘ other yarn end waiting 2 rows below on the edge’ … which would that be for Row 3, colour A? And Row 4, colour B. I have 2 colours waiting 2 rows below. Could you please be more specific as to which colours we pick up in rows 3 and 4. I am not clued in enough to know what ‘other’ yarn end to choose.“
Which end to pick up might not be quite as obvious when first beginning the project, since you might be confused by the cast on end or one of the attached yarn ends. Of course, these are not working ends and are just to be ignored.
To be sure you get started on the right track, the first time thru on row 3, the color you pick up is A. Thereafter, the colors will vary as you repeat rows 3 – 4 in which yarn color you pick up. This is because you are repeating a sequence of 3 yarn ends but are doing a 2-row repeat.
Just give it a try and don’t overthink it. I know it is unusual sequence, but once you see what is happening, it will click.
The Wrong Side
The purl stitch wrong side of the spot woven fabric is not as attractive as the smoother knit stitch right side, but it has functional merit. Think of it as the “scrubby” side of your dishcloth. 🙂
wrong side of spot woven stitch pattern
Weaving in Ends
Susan A asked: “I’m thinking that running in the ends perhaps should be done in the same color row?“
If the only ends you need to weave in are from the cast on, attached yarn ends, and bind off, you can hide all your ends in the side edge stitches. Worsted weight yarn is “fat” enough to do that without problems. (not like having to deal with skinny lace yarn, lol)
If you’ve used bits of scrap yarns for different spot accent colors, you might have more ends to weave in later (in which case, weave the ends on wrong side in the same color row). On the other hand, you can avoid weaving in these extra ends by joining in the new colors as you go with either of these knot-less methods:
- The “interlocking loops” Russian Join. This method produces a clear-cut stop and start between the old and new colors. This might be preferred if the sequence of your gradient colors has a great difference in hues or values.
- The “stitching together” join. This method blends the old and new color for a short ways; therefore particularly nice to preserve a gradient spectrum with slowly changing colors, rather than the abruptness of the interlocking loops Russian Join method. It is also simpler than the Russian Join.
Comparison to Linen Stitch
Harvie Ann C asked “Is this the same as the linen stitch? Love doing it in 2 colors. Thank you for sharing your talents.“
The spot woven technique is similar. If you like doing linen stitch in 2 colors, I think you will like trying this technique. It also uses 2 colors and slips stitches. But produces a different look. You are using 3 ends of yarn — 2 of one color, and 1 of another, and working them in a particular repeating sequence. Another advantage of the 3-ended troika sequence is that the changes of colors are carried up each edge equally (rather than all up on just one of the edges. Hope you enjoy!
Other Questions or Comments? Photos of your Spot Woven Projects?
If you have other questions or concerns about your spot woven projects not covered here, please feel free to leave a comment below. Remember that you can also share pictures of your projects in the KAL Projects Photo Gallery.

 HeartStrings FiberArts
 Knitting Bits of Lace on Facebook
 Ravelry Store