Monthly KAL Photo Challenge

Show off the project you make for this month’s KnitHeartStrings KAL

December 2013 Update: The monthly KAL Photo Challenges for October 2013 and November 2013 have been archived. The KAL Photo Challenge page referenced in the original post below has been replaced by the KAL Project Photo Gallery where you can submit your project photos anytime.


To add to each month’s KAL fun, there now is a KAL Photo Challenge page (it’s right under the Free KAL menu) where you can submit photos of your fabulous KAL projects each month.

With the new Photo Challenge page, you and the other KnitHeartStrings members will also be able to choose the top 3 favorites by voting after the KAL completes at the end of the month.

Adding Photos and Voting

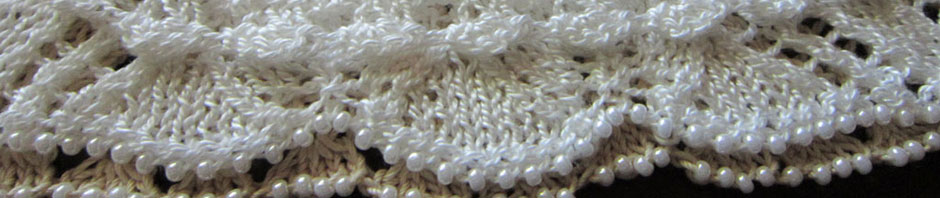
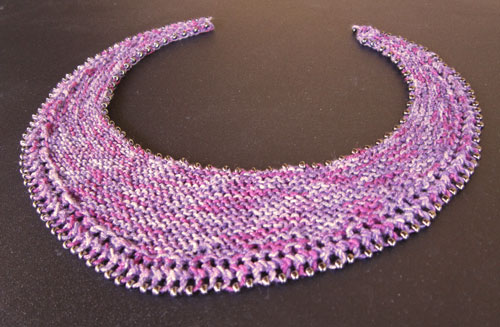
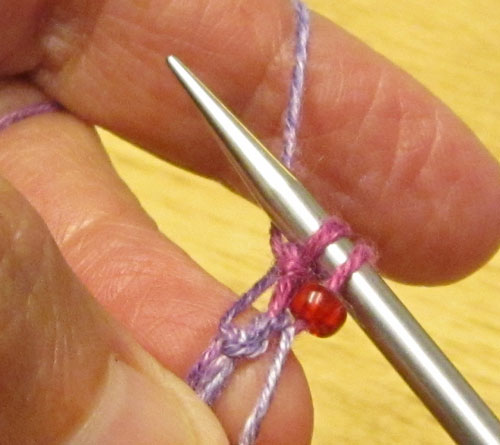
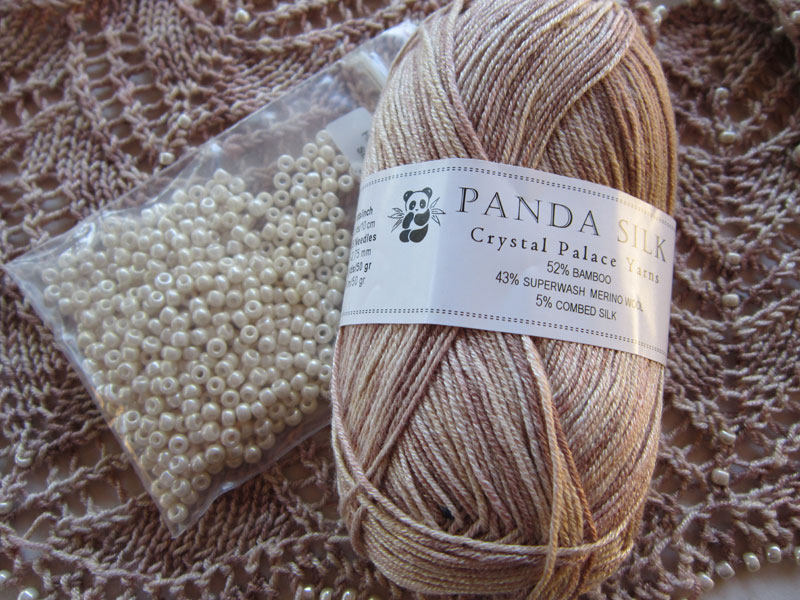
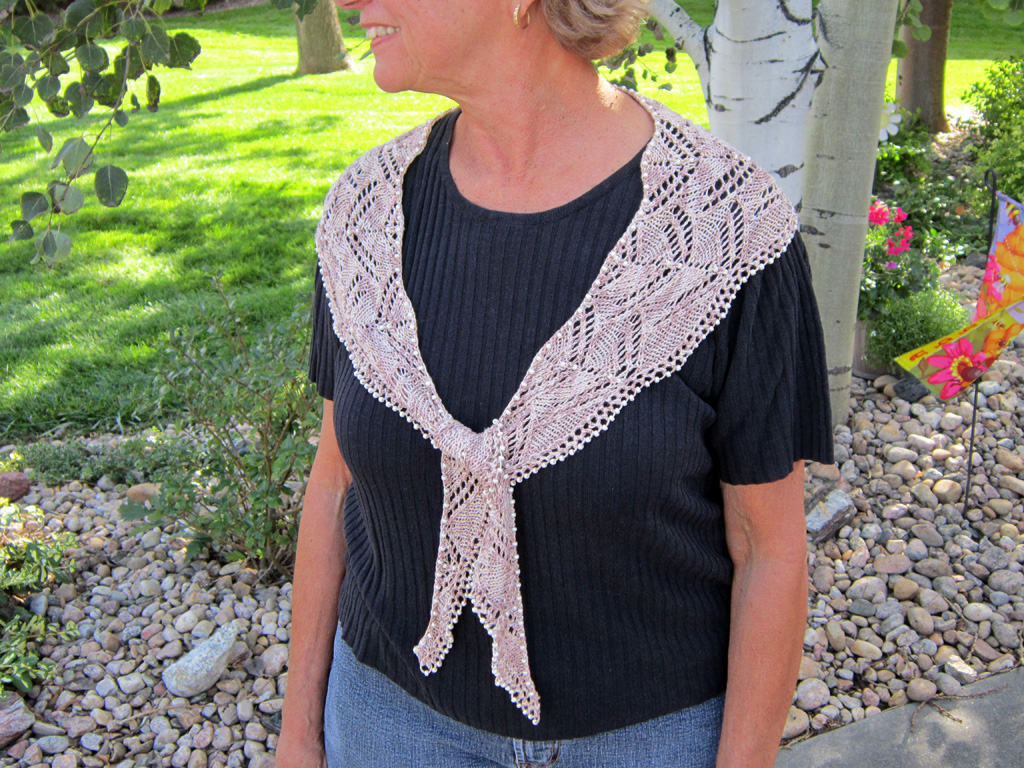
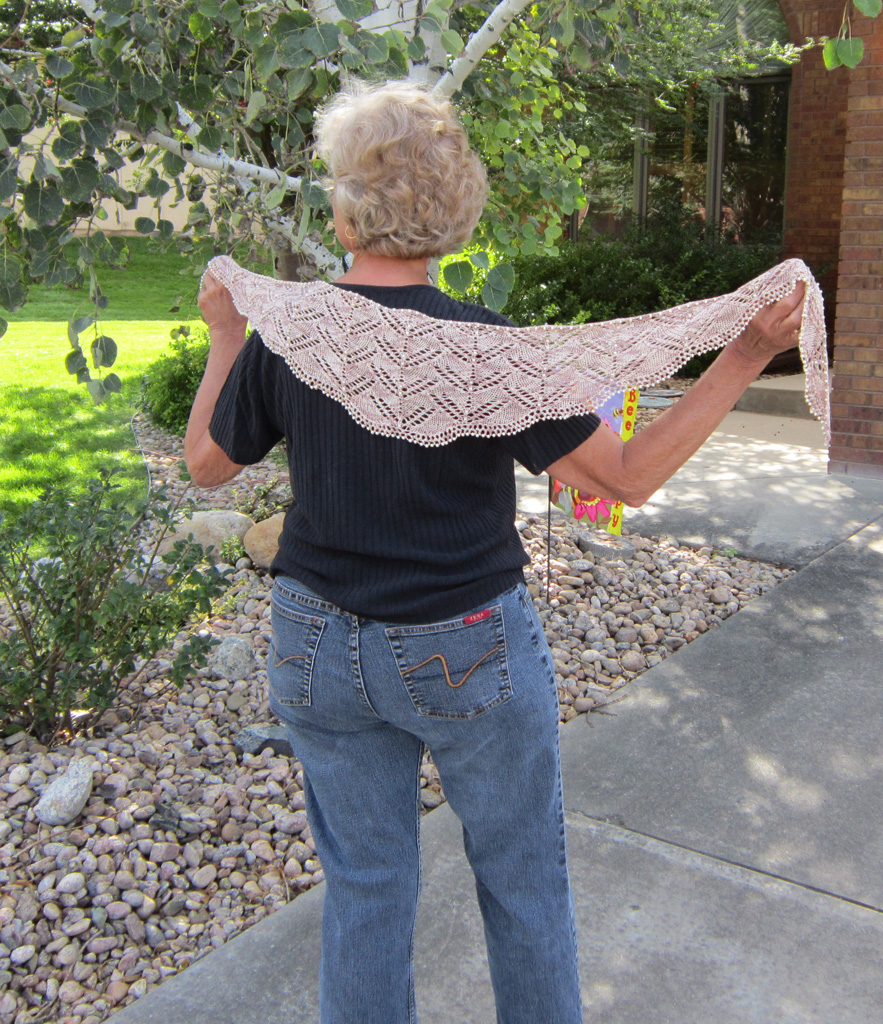
Photo entries for this month’s KAL project, Beaded Crescent Neck Lace, can be submitted anytime through Nov 1, 2013. Voting will be open  Nov 2 – 5, 2013. Winners will be selected for the top 3 photos with most votes. In case of ties, a random selection will be made from photos with equal votes.

It’s easy to submit. Just go to the KAL Photo Challenge page, click on the “Add your link” near the bottom of the screen, then follow the instructions. Remember that the current Photo Challenge is only for the October Beaded Crescent Neck Lace project. Next month will have its own Photo Challenge, etc. etc.

You’ll see on the submission form that there is a place to enter a URL. This is optional. You do not need a blog, site, or URL to enter the challenge. But if you have a Ravelry project page, Flickr photo album or whatever where you’d like to direct people to see more details about your project and larger photos, fill in the URL field with the appropriate internet address (the http:// part is not needed).

Status of the old Member Gallery

The old Member Gallery can still be accessed under the Member Services menu. It is now  called the Archived Photo Gallery. Submissions to this old Gallery page are now closed. Unfortunately the photo uploader on this page broke (it was giving false error messages, thus confusing everyone and driving me crazy) and the developer no longer supports the software. That prompted me to look for a replacement, and make some improvements at the same time. Please instead upload your photos to the new Monthly KAL Photo Challenge.

I hope you enjoy the improved look and new features.

p.s. Don’t be scared to try uploading a photo. If something goes awry or you want to replace with a better photo you get later in the month, I’ve given you the ability to delete any photos you have added to the page before submissions close and voting begins. Likewise, if I added photos on your behalf and you are not satisfied, just let me know and I will correct.

Posted in Just for Fun | Leave a comment

Keeping It Simple Short Rows

Short rows are used to create the crescent shape of the Beaded Crescent Neck Lace. Think of Simple Short Rows as natural lacy holes.

Beaded Crescent Neck Lace in Crystal Palace Yarns Panda Silk

Beaded Crescent Neck Lace

The steps we have completed so far in knitting the Neck Lace are –

Now we are ready to continue with short rows to create the crescent shape.

Quick Definition: A short row (or round) in knitting is worked for only part of the stitches in that row (round), leaving the remaining stitches unworked.

Short rows are often used in knitting to create curves, darts, etc. i.e. some sort of  2- or 3-dimensionality.

There are many methods of working short rows to give different effects or optimize different design features. For the Beaded Crescent Neck Lace, I chose what I call Garter Stitch Simple Short Rows. My basic (jogless) technique boils down to this:

  • Knit to where the short row is supposed to end (the last stitch you knit is called the turning stitch)
  • Turn the work to the other side
  • Bring the yarn between the needles from front to back (the unworked stitches will be to the right and the stitches worked so far in short rows will be to the left)
  • Slip the first stitch purlwise with yarn in back
  • Continue knitting across row until you reach the turning stitch of the previous row, and then knit whatever number of stitches beyond that as called for in the design to create the crescent shape

Tip: Think of Simple Short Rows as natural lacy holes. For those of you familiar with other methods of short rows, there is no “wrap” in this simple short row method. Wraps are a strategy to avoid holes. Since we embrace holes in lace, the simple short row method can give a harmonious look in lace knitting.

Set Up Row

To set up for creating a symmetrical crescent, mark the center position of the row. Then knit to the center + an number of stitches (for the Beaded Crescent Neck Lace, the additional number of stitches = 4).

* Turn and knit to 4 stitches beyond the turning stitch of the previous row. Repeat from * until no more stitches remain at either end of the needles when you make the turn.

How to see or feel the turning stitch of the previous row

If necessary, you can use markers to help you identify your turning stitch. But I would encourage you to practice seeing or feeling where the turning stitch as it can eventually save you time in moving markers repeatedly.

There is a slight gap you can see or feel between the turning stitch of the previous row and the next unworked stitch

There is a slight gap you can see or feel between the turning stitch of the previous row and the next unworked stitch

There is a slight gap you can see (or feel if your fingers are sensitive enough) between the turning stitch of the previous row and the next unworked stitch.

The Formula for Jogless Simple Short Rows

Slipping the first stitch after the turn graduates the height differential; i.e. eliminates the “jog” you sometimes see happen with other types of short row techniques where there is an immediate stair step effect of 2 rows.

  • In garter stitch (such as in the Beaded Crescent Neck Lace), slip that first stitch purlwise with yarn in back.
  • In stockinette stitch (such as in the newly published HeartStrings pattern Swags of Lace Crescent Scarf), on RS slip with yarn in back (wyib) on RS; on WS  slip with yarn in front (wyif); i.e. same position of the yarn as when you are working stockinette stitch
Posted in Tips & Techniques | 3 Comments

Using the Beaded Loops Edging as a basis for casting on

How are you coming along with your Beaded Crescent Neck Lace? If you have completed the Beaded Loops Edging, then you are ready for the next step of using it as a basis for casting on.

You’ll notice that you have beaded loops along one side of the chain, and plain loops along the other side. It is into the plain loops that we are going to now pick up and knit to continue into the main body of the crescent.

Beaded Loops Edging to be used as a basis for casting on

Beaded Loops Edging to be used as a basis for casting on

Tip: This Edging is SO stretchy that you will never fear of having too tight of a cast on! To use Beaded Loops Edging as a basis for casting on in other projects, plan one bead for each stitch to be cast on (you did count your beads accurately, right?). Then follow the same instructions as in the Beaded Crescent Neck Lace pattern.

Picking Up and Knitting into the Beaded Loops Edging

The last stitch of the Beaded Loops Edging counts as the first stitch of the Cast On Row. Then continue to pick up and knit into each non-beaded loop as follows:

Insert needle from front to back into the next non-beaded loop

Insert needle from front to back into the next non-beaded loop …

pick yarn or wrap yarn (depending on your knitting style) with needle tip

… pick yarn or wrap yarn (depending on your knitting style) with needle tip …

 pull yarn through loop to create a cast on stitch

… pull yarn through loop to create a cast on stitch.

Note: Using loops along an edging as a basis for picking up and knitting in the perpendicular direction was introduced in last year’s June KAL for Summer Anklets. In that case, the sock cuff edging was several stitches wide (and without beads), but the technique is the same.

Next up: Garter Stitch Simple Short Rows

Posted in Tips & Techniques | 1 Comment

Photo Tutorial: How to Knit the Beaded Loops Edging

From Marie S“Perfect !  Thank you  so much !  This is just what I was looking for for Christmas gifts.”

The Beaded Crescent Neck Lace pattern doubles as both a beautiful project in its own right and a small practice piece for techniques that might be new to you.

Getting Started

Beaded Crescent Neck Lace is just simple garter stitch with a touch of lace. So the fundamentals are not difficult at all. What sets this project apart is how you let the yarn and beads be the stars of the show.

So first of all, have fun auditioning your yarn stash, or use this as an excuse to find some pretty new yarn at your favorite shop. Choose a neck-caressing yarn in pretty colors to sing accompaniment to the sparkle of beads. The beads will be used to outline the crescent shape of the Neck Lace, starting with a Beaded Loops Edging and ending with a Beaded Bind Off.

From Roxanne“Wow, can’t wait to get started on this.  I have so many ideas on what to do with this.  Love it.”

Stringing Beads for the Beaded Loops Edging

Since the size 6/0 (4 mm diameter) beads called for in this pattern are larger than previous projects where we’ve strung beads, I think you will find stringing these beads quite easy. If you need a refresher (or this is your first time – welcome!), you can search for articles about “stringing beads” on this site.

Tip: Since the bead holes are larger, you can probably even get by with just using a small tapestry needle (I think it usually is a size 22 needle I use for the Miyuki beads, but you might need a smaller size 24 needle for some brands of craft beads).

Beaded Loops Edging Step-by-Step

If you feel a sense of déjà vu when knitting Beaded Loops Edging, you are likely recalling last year’s November KAL project for Knitted Ribbons. I mentioned at that time how the Picot Loops version of Knitted Ribbons makes a lovely cast on. And that is what we are going to do for the Neck Lace, but with the addition of beads, too!

Beaded Loops Edging in progress

Beaded Loops Edging in progress

Beaded Loops Edging is a really simple 2-stitch pattern. To begin, cast on only 2 stitches.

Tip: Keep it simple and don’t over-think this. You can use whatever cast on you want for your 2 stitches. I probably used long tail because that is my defacto unless there is a specific need to do something else.

A yarn over at the beginning of each row followed by p2tog creates a chain of side-by-side loops. On every other row, we slide a bead into place before making the yarn over. The result is beaded loops along one side of the chain, and plain loops along the other side that we will use later on to pick up and continue into the main body of the crescent.

We’ve done yarn over at beginning of row in previous projects. We’re just going to add in the step of placing the bead. Here’s what it looks like in case you need a visual —

With yarn in front of right-hand needle

With yarn in front of right-hand needle …

bring yarn over and around right-hand needle to front again to make yo

… bring yarn over and around right-hand needle to front again to make yo …

insert right-hand needle tip into next 2 stitches

… insert right-hand needle tip into next 2 stitches …

complete the p2tog stitch, taking care that the bead does not come through the new stitch

… complete the p2tog stitch, taking care that the bead does not come through the new stitch.

The completed row

The completed row

Tip: This little edging is pretty even by itself. You might be tempted to not continue with the Neck Lace project, but I hope you will!

From Wendy: “I’ve started the KAL with some of my hand spun wild muga silk yarn that just glistens in the sun. The long chain of beads for the cast on is complete and it is SO pretty just as is. .. but I’m eager to see it finished!”

Posted in Bit-size Tutorials | 1 Comment

Win a Special Prize Edition Kit in October’s Giveaway

October Giveaway – Win a Special Prize Edition Kit for Swags of Lace Crescent Scarf

The Prize to be given to a lucky winner this month is a specially-prepared kit for this occasion with yarn/beads/pattern. It is for a brand new design I am releasing this a little later this month: Swags of Lace Crescent Scarf. I will not be offering these kits — this is a prize-only opportunity for KnitHeartStrings members!

The prize includes:

  • Crystal Palace Panda Silk yarn in color Biscotti
  • Miyuki size 6/0 glass seed beads in color Ivory Ceylon
  • printed autographed pattern

Crystal Palace Panda Silk yarn and Miyuki beads to make Swags of Lace Crescent Scarf

HOW TO ENTER TO WIN. The random drawing  will be held on November 1, 2013 and announced shortly afterwards. Good luck to everyone!

You can see the stitch detail in the photo above, but to further entice you <g>, here are some sneak peek photos (click to enlarge) of the completed Swags of Lace Crescent Scarf you will be able to make with this kit:

Swags of Lace Crescent Scarf

Swags of Lace Crescent Scarf

h95backf-1024

p.s. Yep, that’s me in the photos to give you some ideas of how you can adorn your wardrobe and lifestyle (even it is casual like mine is, lol) with this fluid scarf. I think you will especially love how the sparkly beads frame the crescent of interleaved chevrons of knit lace.


Posted in Just for Fun | Tagged , | Leave a comment

Beaded Crescent Neck Lace KAL

simply beautiful — lace for your neck

Adorn your neckline with a crescent of color and beads. Let’s kick off the October KAL! I’m excited to let you know that you can get your free pattern today for Beaded Crescent Neck Lace, a simple and beautiful lace design to adorn your neckline.

Beaded Crescent Neck Lace in Crystal Palace Yarns Panda Silk

Beaded Crescent Neck Lace

Wear it all by itself as a little neck scarf, or add a clasp and wear as a necklace – your choice. The weight of the beads adds just enough body to the fabric to stay in place.

To knit the project, choose a neck-caressing yarn in pretty colors to sing in accompaniment to the sparkle of beads. You’ll start with the elegant beaded loops lace edging, fill in the crescent with simple garter stitch short rows, then work a beaded bind off for the upper neckline.

Note: Sample shown here was knit in Crystal Palace’s Panda Silk yarn in color #127 Very Berry and Miyuki beads color #451 Hematite (a.k.a gunmetal).

Please feel free to choose whatever colors you want/like, but do check the pattern cover page specifications for yarn weight/yardages and bead sizes/quantity.

The Beaded Crescent Neck Lace pattern is available free to download by  KnitHeartStrings.com members through the end of October. Knit along this month while trying new things and learning with bonus bit-size tutorials, tips & techniques.

I hope you will join us in the knit-and-learn-along this month. Here is the Free Area pattern download page (be sure to be logged in to your KnitHeartStrings member account so you see a download link rather than a buy link).

Remember that Premium Level Members can also get free Ravelry Library Delivery.

Posted in Bits of Beads AND Lace | Leave a comment

Wrap-up for Little Beaded Pumpkin KAL: Stuffing and Closing

After the knitting of Little Beaded Pumpkin is completed, we are ready to finish with a light stuffing and closing off the bottom.

Stuffing

The saran wrap I used for the pumpkin stuffing is certainly non-traditional (or at least I myself had not used it in this way before).

stuffing the pumpkin

stuffing the pumpkin

I would not advise for non-decorative items (especially for any toy-type items that would be washed and dried!), but for something like this little pumpkin it works as a stuffing that will not migrate through the beaded interior (I did want to go to the trouble of an inner lining).

Also, the saran wrap is clear, so might somewhat preserve the luminous look of the beads. But I don’t know if that might just be my imagination.

What do you think? What stuffing did you use?

Closing

Since the closure is at the bottom, it’s not usually going to be seen anyway. So any simple securing of the remaining stitch loops will work.

But if you are wanting to improve your technique, here is another opportunity to use/practice the Gathered Woven Closure.

gathered closure is tidy and doesn't slip

gathered closure is tidy and doesn’t slip

Final Step

bring stem thread through to bottom center to indent the stem a bit and give the pumpkin the shape you want

bring stem thread through to bottom center to indent the stem a bit and give the pumpkin the shape you want

And here is my completed pumpkin.

The completed Little Beaded Pumpkin

I’d love to see what yours looks like. If you have pictures and would like to share, there is a Member Photo Gallery onsite where you can upload your picture. Or if you have a blog, Ravelry project page, etc. just include a link to your pumpkin in the comments below.

Happy Fall!

p.s. I hope you will be knitting with us for the October KAL of Beaded Crescent Neck Lace that is just around the corner. Will you join us?

Posted in Bit-size Tutorials | Leave a comment