Attach-as-you-knit method for lace edging as a bind off

December’s dolly shawl project includes an introduction to attaching a knitted edging to knitted fabric. Whereas for September’s Lace-edged Doily we sewed a completed lace edging to the woven fabric center as a separate step, the dolly shawl edging is attached to knitted fabric at the same time as the lace edging is being knitted.

As explained in Attaching your knitted edging to woven fabric, I advised the separate sewing step method for attaching knitted edging to woven fabric unless you pre-plan and knit carefully to planned gauge, so as to avoid surprise ruffling, or turning your doily into a cupped bowl, or ripping out frustrations.

On the other hand, attaching knitted edging to knitted fabric in the same step is quite doable without a lot of pre-planning or stressing out. Attaching knitted edging to knitted fabric is more forgiving because your are attaching stretchy to stretchy.  Also, the lace edging serves as a stretchy bind off of the knitted fabric at the same time, making this a pretty awesome skill to know.

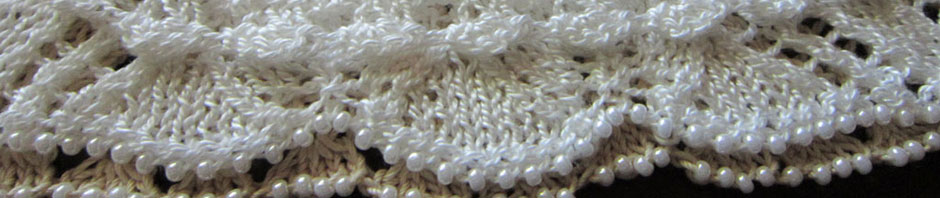
After knitting the body of the dolly shawl, you are ready now to work the lace edging. The edging will be knit perpendicularly to the body of the shawl, binding off a stitch of the shawl body on every other row of the garter stitch lace edging.

Binding off with a lace edging

Binding off with a lace edging

Some points to make about the attached lace edging in the Bits of Lace Dolly Shawl pattern –

1. The yarn is NOT cut after completing the body of the shawl and prior to starting the edging, thereby eliminating the need to weave in extra ends later.

2. For the instructions in the pattern “cast on 4 sts using cable cast on”, you are using the tail of the working yarn to make the cast on stitches.

3. The Foundation Row and even-numbered rows of the Edging pattern are worked toward the body of the shawl; the last stitch of each of these rows also binds off 1 stitch of the body with an ssk.

4. Odd-numbered rows of the Edging pattern are worked away  from the body of the shawl.

5. For those who have been with us at least most of the year, you might have noticed that the lace edging for the Dolly Shawl pattern is basically the same as what we did for the Lace Bug Bookmark.

Questions? Comments? Feel free to join in the conversation and letting us know how you are doing.


Posted in Bit-size Tutorials | Tagged | 5 Comments

Holiday greetings

I hope everyone has been having wonderful holidays.

Now that I have returned from visiting with family, I want to make sure you are doing ok with your little dolly shawls.

I’ll be posting some tips and technique points about the lace edging for the shawl later today.

Meantime, if you have any questions about the December dolly shawl project, leave a comment here.

And remember that you can also show off your dolly shawl (and other Bits of Lace projects) in the Member Gallery. The gallery is set up so that you can upload your own photo(s). Or if you’d like me to upload a photo for you, just attach it to an email with what you’d like to tell us about your project; then send the email to jackie@heartstringsfiberarts.com

p.s. BOBBOL is coming in 2013 for members of KnitHeartStrings. Stay tuned to find out more!

Posted in Bits of Lace | Leave a comment

Top-down Faroese Shawl: The body of the shawl

To start the body of the shawl for this month’s Dolly Shawl, we knit stitches along 3 sides of the little tab-start neck band I talked about a few days ago.

Picking up for seamless construction

By working the Pickup Row as described in the pattern instructions, this method has no seams to finish later.

Also, had you wondered why I was picky about the cast on tail in the neck band instructions? It is so that the cast on tail from the tab start will end up on the inner WS corner of the neck band, thus making it easy to invisibly weave in later without a lot of fiddling.

Markers are your friends

After the Pickup Row has been completed, we set 4 markers to define the 5 sections of the shawl: there are 2 front bands, 2 side panels, and 1 center back gusset. These markers act like “sign posts” when working the rows of the shawl body.

The pattern instructions call for 1 of the markers to be a different color. This is used to help identify the beginning of RS rows (i.e. odd-numbered rows in the case of this pattern). For this pattern, all shaping and yarn overs will be on RS rows. So when you are beginning a row with your different color, wake up and be sure to pay attention. The alternate rows are your “rest” row of just plain knit.

Increases for top-down shaping

In this dolly shawl pattern, I’ve used 2 types of increases to widen the shawl: yarn overs and make 1’s (and their symmetrical counterpart mirror make 1’s).

1. Yarn overs are used to widen the overall body of the shawl along the front bands and on each side of the center back gusset. These yarn overs not only serve as an increase, but also as a decorative, lacy element.

2. Make 1’s (and their symmetrical counterpart mirror make 1’s) are used to slowly widen the front bands and the center back gusset as the body of the shawl gets longer. This type of increase is basically invisible in garter stitch (if not entirely invisible, you probably will find that it is pretty hard to find without close scrutiny). Therefore, I would not blame you if you didn’t want to go to the trouble of mirroring the make 1’s for symmetry as indicated in the pattern instructions. But they are there for the fastidious among us.

3. As instructed in the pattern, the distinctive Faroese shoulder shaping is accomplished with yarn overs that also serve as lacy, decorative elements. You can see the yarn over shoulder shaping clearly in the picture for the Distinctively-shaped Faroese Shawls article.

An easy alternative that will make the shoulder shaping invisible is to use the make 1 type increases. Here is an in-progress photo of a shawl with the invisible shoulder shaping.

In-progress Dolly Shawl with invisible Faroese shoulder shaping

In-progress Dolly Shawl with invisible Faroese shoulder shaping

Time to check (and admire) your work

By starting with just a few stitches, you can become familiar with your yarn and the stitch patterns. In effect, the start of your project is your gauge swatch or practice piece. You can even do a blocking in progress to make sure you like the look and hand of your knitted fabric once it is washed and dried.

Like it? Continue knitting with confidence that you are on track. However, if you need to start over, at least you have not invested the time by started at the widest end of the shawl with a bunch of stitches.

When you are satisfied with the start of the shawl body, now you will have the confidence to proceed as the shawl body widens even though you are working more and more stitches. Relaxed knitting makes fun knitting. And fun knitting is what I wish for you!


Posted in Bit-size Tutorials | Tagged , | Leave a comment

Top-down Faroese Shawl: Starting at Neck Band

The little top-down Dolly Shawl we are knitting this month starts off with just 3 stitches! This is the beginning of a narrow rectangular strip of garter stitch that will become the center back neck band of the shawl.

Tab-start neck band for top-down Faroese shawl

Tab-start neck band for top-down Faroese shawl

Tip 1:  For an adult-size shawl, you probably would want a slightly wider strip of garter stitch. In my full-size Faroese shawl designs, I usually start with just 4 stitches.

Tip 2: The type of cast on you use for this narrow tab-start neck band is not terribly critical because there are so few stitches and it hardly will be noticeable no matter what your choice is anyway. That is why I didn’t bother you with specifying a particular cast on.

But if you’d like to know my preference … I think the Simple Cast On like we used in the Quick Lace-edged Baby Socks at the beginning of this year is the least obvious after stitches are picked up for the shawl body later on.

Working the next row after a Simple Cast On can be a struggle if there are lots of stitches.   But with only 3 (or 4 stitches) to deal with, I think it’s worth it because the minimalist half-hitch of this cast on will blend in with the rest of the fabric in an almost un-obvious, reversible way after stitches are picked up for the shawl body.

Tip 3: When working garter stitch, number of rows can easily be counted by looking at how many ridges you have worked. Did you notice how the reference to garter stitch in the Abbreviations and Special Techniques section of the pattern said: ” … each set of two rows forms a ridge”?

Tip 4: CYA for whatever side you are counting ridges from, or whatever cast on you have used, the pattern instructions have you covered. [superemotions file=”icon_wink.gif” title=”Wink”]

So now you have counted that you’ve worked 9 ridges. And the pattern says “If your cast on tail is at the same side of the knitted strip as your working end, knit one more row”. You are probably wondering why that is in the pattern instructions? That little subtlety  will leave your cast on yarn tail interior to the shawl band for easy, invisible weaving in later (rather than at the edge) no matter what cast on you have used.

If you have completed the number of ridges you want and the cast on tail and working yarn are at the same side as in the above picture, just knit one more row so that the cast on tail can later be invisibly woven into the interior of the shawl rather than at edge.

Tip 5: For an adult-size shawl, the strip for the tab-start neck band would be knit longer to span the back width of the neck. I usually use 23 ridges.

OK, so I agree that what we have so far doesn’t look like much of a shawl, lol. But hang in there — As some of you who have been following me for quite a while might remember I have been known to say “Finishing starts at the beginning”. I’ll be back soon with more about the little tips and techniques in this month’s project.

p.s. In case you are wondering, the yarn in the above picture is Lorna’s Lace Shepherd Sport in color Childs Play. Just wait until you see the next post where I have pictures of the start of the shawl body. It looks like a rainbow!


Posted in Tips & Techniques | Tagged , | 2 Comments

Distinctively-shaped Faroese Shawls

The distinctive “butterfly” shaping of the Faroese shawl makes an exceptionally wearable garment because of the shaped shoulders and elongated ends for optionally tying around the waist. Another distinctive feature of Faroese shawls is a center back panel, a.k.a.  gusset, that separates 2 side panels.

Doll-sized Faroese Shawl

This Doll-sized Shawl demonstrates the distinctive characteristics of traditionally-shaped Faroese shawls

Classic Faroese shawls are knitted bottom up. Thus, you would usually start with a bunch of stitches, and the shaping would be accomplished by decreasing.

Traditional look with updated methods

In the early 1990’s when I first discovered Faroese shawls, I also was in my early days of learning to handspin my own yarn. As a novice, I was not always sure of how much yarn I would have. I feared starting a bottom-up shawl and possibly running out of yarn before completed. So I devised a top-down approach that started with just a few stitches and simulated the shaping by increasing. In this way, I was always assured of ending up with a completed, usable shawl that could be knit to the length based on the amount of yarn I had spun.

As time went on, of course I became better at handspinning and producing known amounts of yarn, lol. But I still prefer working Faroese shawls top-down. Therefore, all the Faroese shawl designs in my HeartStrings collection are worked from the neckband down. You start with just a few stitches so that you can become familiar with your yarn and the stitch patterns.

A Bit of Lace Dolly Shawl is a great way to have fun learning top-down Faroese shaping on a small shawl before putting the time into a larger shawl. This basic pattern uses simple yarn over increases to achieve the traditional center back panel, side panels, front bands, and shaped shoulders.

Posted in Bit-size Tutorials | Tagged , , | 1 Comment

New Ravelry delivery option

Exciting news for Ravelry members! Do you like to keep your patterns in your library at Ravelry?

KnitHeartStrings Members can now also get the monthly KnitHeartStrings member pattern delivered to their Ravelry library for free. A Coupon Code will be offered to apply to the pattern purchase price at Ravelry.

Not a Ravelry member? KnitHeartStrings Members can also still download the monthly   member  pattern directly from this site without going through Ravelry.

But if by chance you are one of those having trouble downloading from this site (for whatever reason), signing up with Ravelry and downloading to your library account there is now an alternative.

Posted in Bits of Lace | Tagged | 4 Comments

Errata for Dolly Shawl row 1 of edging

A tiny correction is needed to the Dolly Shawl pattern that you might have already downloaded between Dec 1st – 5th. If your pattern number in the right-hand corner of the first page is H134-2330, then please mark this correction on page 3 in the Edging section: Row 1 should read 6 sts (rather than 7 sts).

This is what I get for making last-minute changes and trying to travel between computers at the same time. But nevertheless, I should have caught this earlier and I do apologize. I updated the pattern file yesterday afternoon (Dec 5), so some of you might have already gotten the new version (which is H134-2336). Anyone who has downloaded the pattern file previously, can also download the new version if you want to.

For those of you who have been with us since the beginning of the year, you might have noticed that the lace edging for the Dolly Shawl pattern is basically the same as what we did for the Lace Bug Bookmark.

The main difference is that I decided (at the last minute, lol) to substitute a single yarn over for the double yarn over (and thus why I originally had the Dolly Shawl pattern laid out to have 7 sts in Row 1 of the edging; but when the single yarn over is substituted there are actually only 6 sts).

The reason I made the substitution is that I felt the double yarn over created too large of a hole with the larger needles we are using for the Dolly Shawl (compared to the smaller needles used for the Lace Bug Bookmark). I’d love to hear what you think (either now or later when you get to this point in the project).

Posted in Bits of Lace | 6 Comments