Charting the chain stitch selvedge

In last month’s project for Three Eyelets Sachet , the lace edging had a chain stitch selvedge along both the straight edge and the shaped edge.

Did you recognize that the Chain Stitch Selvedge is also used at each side edge of this month’s Lace Cable Bookmark project? But this time both edges are straight (rather than one shaped). The Chain Stitch Selvedge makes a tidy perpendicular straight line along each side edge. Do you see how the “chain” of the chain stitch selvedge lies sideways to the adjacent stitches?

Chain Stitch Selvedge

Chain Stitch Selvedge


In the chart for the bookmark, since the chart cells are aligned on top of each other, the chain stitch selvedge on each edge is easily identified by how each purlwise-with-yarn-in-front slip stitch at the beginning of the row is then knitted on the return row.

Snippet of Lace Cable Bookmark chart

Snippet of Lace Cable Bookmark chart

Above is a snippet of the Lace Cable Bookmark chart just in case you don’t have your pattern handy. I want you to recognize how the chart shows the chain stitch selvedge at the beginning of both the RS row and return WS rows.

The Chain Stitch Selvedge is just one of the many ways we might want to treat the edge stitches of our lace edgings and other lace projects. I will be expanding on this in future segments. Meantime, learning to use and recognize the chain stitch selvedge can be a useful skill to keep ready in your knitting bag of techniques.

Posted in Bit-size Tutorials | Tagged , , | 1 Comment

Basics of Knitting Symbol Charts

Learn how the symbol chart itself, the symbol key, and the visual similarity to the actual knitted piece all work together to communicate how to knit a lace pattern stitch.

Knitting symbol charts are comprised of two main components: the Chart Graph itself and the Symbol Key.

The Chart Graph is the symbolic instructions for the stitch pattern. The graph is a grid of rows and columns representing knitted rows (or rounds if knitting circularly) and stitches respectively. Each graph grid usually represents the result of making one stitch or stitch sequence. (“No stitch” is an exception that I will cover separately in an upcoming Bit-size Tutorial.)

The chart graph rows are arranged horizontally from bottom to top to simulate the building of one row (or round) above another as our knitting progresses.

The columns are arranged vertically so that reading progresses from right to left on RS rows (or rounds), and from left to right on WS rows.

Example of a Simple Lace Chart Graph

Example of a simple Lace Chart Graph where the WS return rows are not charted

(Note: WS rows are sometimes omitted if there is only plain knitting or purling involved; if this is the case, there should be a written statement somewhere in the pattern publication to let you know how to work the un-charted rows.)

The Symbol Key is an important component of instructions that you should expect to have been provided in any pattern publication that uses knitting charts. This is the language translation of each  chart grid symbol into its corresponding knitting instruction.

Example of a Symbol Key

Example of a Symbol Key

Before jumping into the Chart Grid, take time to study the Symbol Key and acquaint yourself with its language translation. (Note: If the Symbol Key itself refers to abbreviations or special terms, look for the description of these in the publication.)

Depending on the choice of symbols used in the pattern instructions, Lace Charts often look similar to the stitch pattern they will produce when knitted as viewed from the right side (or preferred side if reversible/nearly reversible).

Visual similarity of knitted swatch to lace chart graph

Visual similarity of knitted swatch to lace chart graph (the chart has been repeated 3 times across each row; the WS return rows were purled)

Did you notice some similarity in the chart for the Lace Cable Bookmark project this month? This similarity can help you in visually checking your knitting for reasonability as mentioned in the post on Striving for Perfect Results.

How are you doing with the Lace Cable Bookmark project this month?  I hope I made everything easy to find in the pattern instructions. Have you been using the chart, or the written instructions, or both? Are you having fun? (I hope!)

I’ll be back with more about lace charts, tips, etc. in a few days. ‘Til then, feel free to share your progress, questions, comments, etc. I don’t want things to get too quiet and think I am the only one knitting and talking around here!

Posted in Bit-size Tutorials | Tagged , , | Leave a comment

Communicating Lace Pattern Instructions

In the Bit-size Tutorial You Know More than You Realize, I reminded you of common basic stitches that you probably were already well familiar with. I wanted to point out how this handful of stitches serves as building blocks for a huge portion of lace knitting patterns. It is the combinations and sequence of working these stitches, plus sometimes others, that results in the beautiful lace patterns we admire.

To enjoy the making of these lace stitches ourselves, while preserving the heritage and knowledge to pass them along to future generations, you might come across different ways of documenting and communicating the pattern instructions. I think of the styles of communicating these instructions in 4 broad categories.

Samplers

Samplers have a wonderful history. As explained by Susanne E. Lewis in her book Knitting Lace: A Workshop with Patterns and Projects (page x of Introduction):

“Patterns were rarely published or even written down, particularly in remote communities, because illiteracy was widespread and paper was scarce and expensive. Instead, knitters customarily made samplers to record the patterns.”

Think of samplers as the earliest stitch dictionary reference by which pattern stitches were communicated. It took skill in visually inspecting the piece of actual knitting and translating that to the sequence of stitches to be knit to achieve the same result. If something was done slightly differently, then a variation resulted (either intentionally or unintentionally). Thus further enriching the repertoire of lace patterns passed along to us.

A lace sampler I made based on the original in the Brooklyn Museum

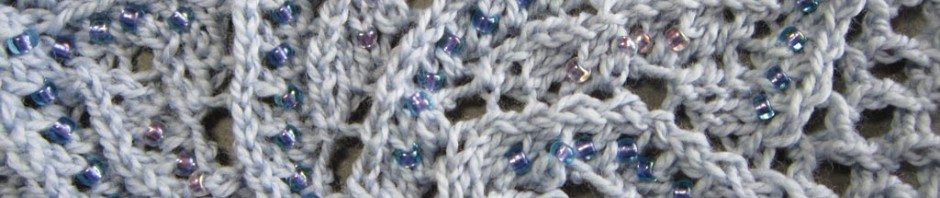
A lace sampler I made based on the original in the Brooklyn Museum that Susanna E. Lewis studied and wrote about in her book

Written Text

A common way of communicating knitting patterns today is written out line by line. Abbreviations may or may not be used to shorten the amount of space taken up by the text in a publication and/or making the instructions easier to read in a glance.

But first, make sure you know exactly what the abbreviations and terms mean in the context of that particular publication — there are no worldwide standards! There should always be a list of abbreviations and any special terminology in the publication somewhere. Take the time to look for it and acquaint yourself with its “language”. This will save you time in making assumptions that can lead in the best case to “interesting” results, or in the worst case to disappointing results.

For example, a single abbreviation/term such as “make 1” can mean different things depending on the publication. Or multiple abbreviations/terms such as “yo” and “yrn” can mean the same thing.

Lace Charts

I think of Lace Charts as the modern-day substitute of the historical samplers. They are similar in that they are a visual representation (to the degree that a chart resembles the resulting pattern stitch).

This method relies on the use of symbols. Each symbol uniquely represents one stitch or stitch sequence in the chart. The symbol graphic may resemble the appearance of the resulting stitch.

Since this month’s Lace Cable Bookmark project introduces knitting lace from charts, I will have much more to say throughout the month about Lace Charts in upcoming Bit-size Tutorials, Tips & Techniques.

Lace Shorthand

A hybrid that I dub “lace shorthand” sort of combines line-by-line written text and symbols. For example, Barbara Abbey devised a “lace shorthand” she used in her  book Knitting Lace. To give you a flavor of her lace shorthand, here is Row 8 of an edging pattern on page 98 of the book: 1, /, 0, \, 3, /, 0, 2, f.

I have come across a few other instances of “lace shorthand”, but overall this way of communicating instructions does not seem to be as widely adopted as Written Text and Lace Charts. As always, be sure to take the time to find the place in the publication that explains the “language” and acquaint yourself with it. You might even consider re-writing the shorthand in your own preferred style of instructions to make it simpler, easier, and more enjoyable for you to knit. Taking that bit of time can save you time in the long run.

For Bits of Lace 2012, I will be continuing to offer instructions as written text, as well as Lace Charts for some of the future monthly projects. But I wanted to also give you some of the historical background of samplers, as well as touch on lace shorthand in case you come across something like it elsewhere.

Posted in Bit-size Tutorials | Tagged , | 2 Comments

Lace Cable Bookmark and a chance to learn to use charts (if you want to)

Grab this month’s free pdf download pattern for Lace Cable Bookmark now through May  25, 2012 at the Free Membership Pattern page.

Way back on January 26, 2012, Cerddin of Canterbury, England asked:

Thanks Jackie
I love lace knitting even if I am a bit slow. I prefer charts to written instructions – will you be producing any of the patterns as charts? Well done on all you do.

The answer is a resounding “yes”. In fact, this month’s little project will be the introduction to charted instructions.

Lace Cable Bookmark is not a lace edging per se (i.e. there is not the usual shaped edge on one side). The simple rectangular shape will allow you to concentrate on learning the basics of knitting lace with charts without the distraction of simultaneously dealing with a shaped edge. But hang in there, because we definitely have future monthly projects that are more complex and have both charted instructions and shaped edges!

[wp_lightbox_prettyPhoto_image link=”http://www.heartstringsfiberarts.com/images/a194f.jpg” description=”Lace Cable Bookmark” source=”https://www.knitheartstrings.com/images/postcard-lace-cable-bookmark-banner.jpg” title=”Knitting Bits of Lace Series”]

Stay tuned for follow-up tutorials, tips & techniques on this site. And don’t forget to also visit HeartStrings FiberArts for other inspiration and patterns offered by retailers of Jackie E-S’s designs.

p.s. Don’t be scared that this month’s project introduces charts. Even if you have not used charts in the past, there are written instructions to help ease your way into feeling comfortable using charts (if you want to).

Posted in Bits of Lace | Tagged , , | 7 Comments

Last day of Three Eyelets Sachet – Are you ready for more Bits of Lace 2012?

This is the last day of Three Eyelets Sachet in the Bits of Lace 2012 series. I hope you enjoyed making a sachet or two, and I hope you learned a bit from it as well, along with the tutorials, tips & techniques this month.

If you liked this month’s project and like the idea of starting off your knitting with a piece of lace edging like we did with the Three Eyelets Sachet (i.e. no seaming), I wanted to point out that  HeartStrings pattern #A85 Summer Lace Anklets features anklet-style socks that start with a split cuff lace edging.

Summer Lace Anklets with split cuff lace edging

Summer Lace Anklets with split cuff lace edging

I encourage you to continue to think of creative ways you can use lace edgings in similar ways. Have fun!

p.s. I’ll be back tomorrow with the next monthly pattern project for Bits of Lace 2012. Stop by then so you can find out what the new month’s pattern is; grab it early and get started. More fun and bit-size learnin’ a-comin’!

Posted in Bit-size Tutorials | Tagged , , | Leave a comment

How You Slip Does Matter – The Chain Stitch Selvedge

I commented that the “ladder” eyelet header instructions introduced in Lace Edging Building Blocks – The Heading also featured a chain stitch selvedge. This type selvedge, being particularly stretchy, is good for attaching lace edgings to things that themselves are stretchy (like other knit items).

To get maximum stretchiness: How you slip DOES matter. And the type stitch you slip matters.

Here is the formula to make a chain selvedge –

  • Begin each row on which you want a stretchy chain selvedge with sl 1 pwise wyif.
  • For the return row, end with k1.

It’s as simple as that. But an important formula to know and realize that the nuances of how you work that slipped stitch (both on the row to slip the stitch, and on the return row) WILL matter if your desired result is maximum stretchiness.

p.s. The chain selvedge is also an often-used smooth-looking selvedge for lace articles that are going to be severely stretched during tension blocking.

Posted in Tips & Techniques | Tagged , | 8 Comments

Lace Edging Building Blocks – The Heading

More complex, wider edgings are often just combinations of portions of smaller edging patterns. The narrow “heading” pattern usually present at the straight edge is one that is easily substituted to meet your needs for function and design.

By function, I mean things like –

  • is the heading to be decorative only, or will it additionally be used for another purpose such as insertion of a gathering ribbon?
  • what kind of fabric/material is the lace edging going to be attached to?
  • what kind of everyday wear is the article and its lace edging going to subjected to?

For a review of the portion of the lace edging I am referring to as the “heading”, look at the Basic Anatomy of Knitted Lace Edging schematic I introduced in the Bit-size Tutorial Knitted Lace Edgings: a working definition and basic characteristics about 6 weeks ago. If you are just joining in now, please read that tutorial first, as I will be referring to concepts introduced there.

The Three Eyelets Sachet that you have been working on this month has a 4-stitch header with a “ladder” of eyelets. This particular header is ideal for weaving a decorative ribbon through and gathering (as for our sachet). Additionally, the outermost stitch of the straight edge is a chain stitch selvedge (more about this in a future post).

Header of lace ladder  eyelets along straight edge of Three Eyelets Lace Edging pattern

Header of lace ladder eyelets along straight edge of Three Eyelets Lace Edging

Here are the “building block” instructions you can substitute in any lace edging pattern where you want this look/function:

  • For rows beginning at the straight edge, the first 4 sts are: sl 1 pwise wyif, yo, p2tog, followed by a knit stitch …
  • For the return rows, they always end with these 4 sts: … a knit stitch, followed by yo, p2tog, k1.

If you’ve been following along with other lace edging patterns we’ve been doing, you can  see that each has had a slightly different header pattern. Over the coming weeks, I will help you isolate the building block instructions for each header, and some pointers on its function and design.

Posted in Bit-size Tutorials | 1 Comment