Q&A: nuances of the half-hitch simple cast on

I am adding a new Q&A category that will highlight a question or comment. I’ll occasionally alternate these weekly with the Bit-size Tutorials or Tips & Techniques. They all sort of go hand-in-hand, so I hope you will always check all of them out for things you might find an “ah-ha” moment.

Even though you might have seen a reply in the comments to a particular post or pattern, I wanted to be sure you could benefit from a brief reply you might have missed. I will also usually have some pictures or other content to expand upon the comment/question and reply. Sound good? Please let me know what you think of this approach.

FIRST UP! Even the “simple” cast on has it’s nuances, as this week’s bit-size Q&A will point out.

Janey commented to the Simple Cast On post –

The half-hitch cast on looks like the thumb cast on that I do – at least it looks like my thumb cast on if I keep the stitches far apart.

There are lots of names for this type cast on. Try it and see if it ends up being the same. In certain cases where the first stitch of the row is slipped purlwise with yarn in front (sl1 pwise wyif) after casting on (which sometimes is the case in lace edgings), it can make a difference in whether the working end is coming out back or front the loop on the needle.

If the working end is going toward the back as the work faces you to begin the row, the sl1 pwise wyif stitch will hold.

simple half hitch cast on (working end to back)

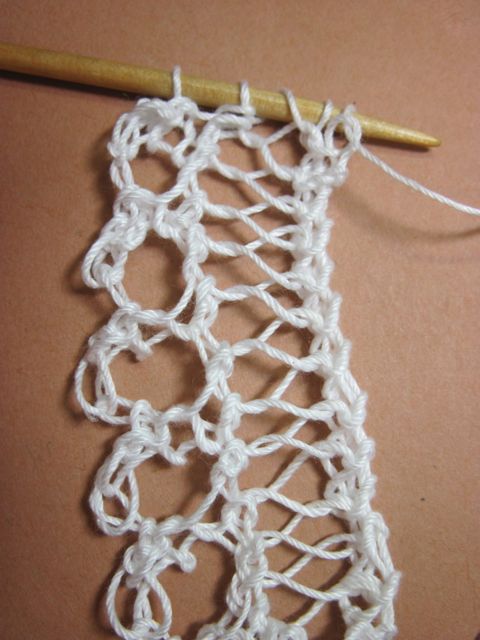
working end of simple half-hitch cast on is going toward the BACK as the work faces you to begin knitting first row

If its not, the cast on stitch will become undone. So just check this out with your method.

simple half hitch cast on (working end to front)

working end of simple half-hitch cast on is coming to the FRONT as the work faces you to begin knitting first row

So far our 2 little bit-size monthly lace edging projects have not begun with a row that is slipped purlwise with yarn in front after casting (and intentionally, thus I didn’t need to get into this little detail yet). But that will be coming up. In the spirit of taking things one bit at a time, this is just one of those things to add to your growing bag of lace knitting know-how that I hope will help you become even more comfortable in understanding the nuances of loops of yarn./thread

Posted in Q&A | Tagged | 1 Comment

Substituting a single yarn over for a double yarn over eyelet

This week’s article for Tips & Techniques continues on from last week’s Double Yarn Over. Please read that article first (or again as a reminder), as my discussion and photos will not be covering some of the steps shown in that article. This will just show a variation that you might want to substitute.

The double yarn over can make quite a large eyelet that to some people’s tastes (or knitting style) is too large. If you prefer a smaller yarn over, try this tip.

When a yarn over twice is called for, substitute just a single yarn over. Then, on the return row, work your k1 and p1 into that single yarn over. Here are some step-by-step pictures of that return row —

This is the start of the return row (i.e. Row 2 of the Lace Bug Bookmark pattern) after having done a single yarn over rather than a double yarn over on the previous row 1.

Ready to work into the single yarn over of the previous row

Ready to work into the single yarn over of the previous row

Knit into the yarn over of previous row, but don't remove the yarn over loop from left-hand needle yet

Knit into the yarn over of previous row, but don't remove the yarn over loop from left-hand needle yet

Then proceed to work a purl stitch into that same yarn over loop.

The purl stitch has been completed and the yarn over loop dropped off the left-hand needle

The purl stitch has been completed and the yarn over loop has been dropped off the left-hand needle

It’s as simple as that. Just continue to knit the remainder of the pattern repeat as usual. Here is a photo showing the slightly smaller eyelets using this ‘single yarn over’ substitution on the last 2 repeats of the pattern compared to using ‘yo twice’ called for in the pattern.

Note: The eyelet closest to the needle looks even a bit smaller than the one I did prior to that because the most recent eyelet is still hugging the needle and hasn’t been stretched out.

So, what do you think? For this particular pattern, I like the scale of the original double yarn overs to be more in keeping with the width of the lace faggot heading. But I have had occasion in lace patterns where I am knitting in a yarn fiber that just stretches out too much when doing a full two yarn overs. This ‘single yo’ substitution trick is what I use to compensate.

Whether you find a use for it now or later, I hope you find this a useful tip to have in your growing lace knitting bag of tips and tricks.

Posted in Tips & Techniques | Tagged , | 3 Comments

Distinctive and Decorative – the Double Yarn Over

In this month’s project for the Lace Bug Bookmark, I introduced the double yarn over technique. This design element is what makes the distinctive large eyelet in the lace edging.

As a quick overview, the instructions call for you to “yo twice” on Row 1 (i.e. a double yarn over). Then on Row 2, you are instructed to “k1 and p1 into the double yo of Row 1”.

Let’s take it through it’s steps. The double yarn over is not difficult, but it can be tricky to control the looseness of the loops when using fine yarns/threads or working on slick needles. Practice makes perfect. Let these detailed photo steps help you gain confidence that you are on the right track.

Yarn begins forward of needle

Yarn begins forward of needle to begin the first yarn over

Yarn over needle and to front again to start second yarn over

Wrap yarn over needle and to front again to start second yarn over

Wrap the yarn over the needle again to make the 2nd yarn over loop, then complete the knit stitch that follows

Wrap the yarn over the needle again to make the 2nd yarn over loop, then complete as usual the knit stitch that follows

The double yarn over is simply 2 extra loops as seen sitting on the needle between the 2 knit stitches.

See how the double yarn over is simply 2 extra loops sitting on the needle between the 2 knit stitches

When you turn the work to work the next side, this is what it will look like

This is what things look like after you've turned the work to the other side and slipped the first stitch; you are now positioned to start working into the two yarn over loops of the previous row

Knit into the first yarn over loop

Knit into the first yarn over loop

Complete that knit stitch as usual and drop the yarn over loop you had worked into off the left-hand needle

Complete that knit stitch as usual and drop the yarn over loop you had worked into off the left-hand needle

You’ve completed knitting into the first yarn loop at this point. You still have the second yarn over loop on your knitting needle. Do you see that?

Bring yarn forward between needles to make a purl stitch

Bring yarn forward between needles to make a purl stitch

Into the second yarn over loop, make a purl stitch as usual

Into the second yarn over loop, make a purl stitch as usual

The purl stitch has been completed and the second yarn over loop dropped off the left-hand needle

The purl stitch has been completed and the second yarn over loop dropped off the left-hand needle

This is row 2 completed

This is row 2 completed

Row 3 after completion

Row 3 after completion

Row 3 is straightforward. But that is when it becomes more apparent that there is a little nubb on the top of the large eyelet formed by the double yarn over. This is because of the crossing over the yarn strand from knit to purl. I can almost see a heart shape there where the little nubb is the top of the heart. But then, we love hearts here at HeartStrings, lol.

And here is row 4 completed

And here is row 4 completed

There are some alternative ways to work the second row of the double yarn over. But they all produce some kind of little decorative element like this. This could be something we come back to covering more at a later time,

By the way, if you are wondering if you can just knit the first yarn over loop, and knit the second so that there is no decorative nubb element, try it and you will see how it fails.

If you are thinking a double eyelet is too large or loose for your method of knitting, there is a simple way to substitute a single yarn over followed by a k1, p1 into that single yarn over loop on the following row. I’ll be back with a little photo series about that later in the month in case you need more help in seeing the details.

I hope this helps you see and understand better what is going on in making this interesting decorative element in lace. What do you think?


Posted in Tips & Techniques | Tagged , , , | 6 Comments

You know more than you realize

Basic Stitches of Lace 

There is no real mystery to the stitches used in most lace patterns. In fact, you probably know most of those already from your regular knitting.

But when we throw in knitting in tiny yarn, on tiny needles, and maybe even esoteric vintage lace edging instructions that you are attracted by and want to knit, it might seem overwhelming. Never fear. We’ll continue to take bit-sized steps in tackling these throughout the coming weeks.

So, this bit-size tutorial is moreso just to reinforce the common basic stitches that you probably already are well familiar with, and assure you that even if you only know these you probably are 80% (or more) on your way to being a star lace knitter.

Lace Edging

This lovely, delicate lace edging uses basic stitches talked about in this Bit-size Tutorial.

I will share the lace edging shown above in a future month’s project, but wanted to encourage you now by seeing how beautifully even the basic stitches can come together.

Knit stitch

Usually the knit stitch is abbreviated by k followed by the number of knit stitches to make.

But in vintage or other short-hand instruction styles, there could just be a number; e.g. 2 for k2.

Purl stitch

Usually the purl stitch is abbreviated by p followed by the number of purl stitch to make.

Yarn over

The stitch that makes the extra loop, or opening in lace, is usually abbreviated yo in modern American instructions.

But vintage or non-US instructions might just use the term “over”.

Or they might just write “O” in short-hand abbreviated instructions.

Similar terms used in some instructions (e.g. UK-based) differentiate about how the extra loop is made. These include yfwd, yrn, yon, wl fwd. But they all boil down to the simple YO. I’ll do a tutorial on this specific area in the future.

There was one specialized method for doing a yarn over at the beginning of the row that we already covered. If you did not see that, or want to review it again, it is here.

And in this month’s project, it calls for the “yo twice” sequence (i.e. double yarn over). I am going talk about that in the next Tips & Techniques post, so be sure to look at that, too.

Right-slanting decrease

A common element of lace is the decrease stitch. This compensates for the increase stitch that a yarn over makes. Or it can be used to shape the edge of a lace edging.

By right-slanting, I mean a decrease that slants like this when viewed on the side of the knitting facing you: /

The most common right-slanting decrease you will encounter is k2tog = knit 2 stitch together. Something you’ve probably known forever. See, I knew you were already ready for lace stardom.

In vintage instructions, the decrease might just be written as “n” (meaning to narrow). Makes sense, right?

Left-slanting decrease

Whereas the method for making a right-slanting decrease is quite commonly established, the techniques for making a mirrored left-slanting decrease are less so. Again, this is a method that  compensates for the increase stitch that a yarn over makes. Or it can be used to shape the edge of a lace edging.

By left-slanting, I mean a decrease that slants like this when viewed on the side of the knitting facing you: \

The most common methods are either

  • ssk  = slip, slip, knit (meaning you should slip 1 stitch as if to knit, and then slip another stitch as if to knit; insert left-hand needle into the 2 slipped stitches from left to right and knit these 2 stitches together
  • skp = slip 1 stitch as to knit, knit 1, pass slipped stitch over

The ssk and skp produce basically the same results so they can be substituted for each other. Just use whichever you prefer for your style of knitting.

Of course, there are other stitch sequences that we are going to eventually turn up. Don’t worry though. I will help you through that. Meantime, just knit happy, knowing that you know lots about lace already.


Posted in Bit-size Tutorials | Tagged | 1 Comment

next up for Bits of Lace 2012 series

Thank you for participating in Bits of Lace 2012. I hope you had fun with the first month’s pattern for Quick Lace-Edged Baby Socks. And learning (or just being reminded of) some things, too, from the bit-sized tutorials and tips/techniques articles.

I will be posting the new month’s pattern sometime this weekend in the Free Membership Pattern area. Remember that you need to be a registered member and logged into the site to access the pattern. Meantime, you can find out more about this month’s Bits of Lace project by visiting the Lace Bug Bookmark page at the HeartStrings FiberArts website.

Lace Bug Bookmark

I’ll be back next weekend to continue with more tutorials and tips. Do invite your friends to join in. Let’s take the art of knitting to new heights!

p.s. Once I post the new month’s pattern, the prior month’s Quick Lace-Edged Baby Socks pattern will no longer be available in the Free Membership Pattern area. Prior months’ patterns will be available for sale or as part of the Premium Membership Level to be implemented later in 2012.

Posted in Bits of Lace | 1 Comment

Curved edge bind off

The shaped edge of the pattern we did for the little baby socks edging was achieved by a combination of extra increases and bound off stitches.

  • There were extra yarn over increases on rows 1, 3 and 5 which widened the edging.
  • Then the edging narrowed on row 6 to its original cast on stitch count by binding off stitches.

This is an approach that is common to many lace edging patterns, and we are going to see it come up in several of our next projects as well.

Examples of lace edgings with a scalloped shaped edgeWhen the design calls for creating a scalloped edge (such as on the baby socks edging) rather than a pointy one, it is useful to point out the little trick to getting a nice curved edge rather than a jagged point where the bound off row begins.

Bind Off (for curved edge) – slip 1 stitch purlwise, * k1, pass previous stitch over; repeat from *

The slip 1 is the important thing in this bind off. It results in the beginning of the bound off row to curve rather than be pointy.

The rest of the instructions is just a standard simple bind off. Each repeat between the asterisks will bind off one stitch (i.e. will reduce the stitch count of the row by one).

You can prove this to yourself by knitting the first stitch of the row rather than slipping. Then proceed with your bind off. Even though the look will differ only slightly, it is subtle touches like this that can help make your knitting extra special.

Posted in Tips & Techniques | 1 Comment

3 points about knitting needles to make lace edging

Last week we saw that the choice of a thread can go hand in hand with the choice of knitting needle size to be used. That leads us into this week’s bit-size tutorial about choosing knitting needles for making your lace edging.

Quite simply, there are 3 general points I consider in choosing the knitting needles to use for a lace edging project. (In fact, other than the first point below, the remainder apply to lace in general.) Remember that these are generalizations, and ultimately your personal preferences will reign (as well as possibly what needles you already have available in your knitting tool arsenal).

1. Since lace edgings are often very narrow, consider using short straight needles.

I’m not normally a straight needle kind of person (I prefer circulars in most cases). But if there are only going to be a handful of stitches on the needles, I grab a couple of double point needles and use those.

If it bothers you that there is an extra point on the other end of the double point needle that you don’t need to use (or you fear your stitches will fall off), just cap that end with a point protector or piece of cork or whatever. Be inventive!

2. The needles for knitting lace are usually relatively large compared to normal knitting with similar weight thread/yarn.

Don’t be afraid of trying a range of needle sizes.

Fortunately, lace edgings usually have so few stitches, that a 3 to 4 inch length sample size takes hardly any time to make. The needle size YOU need to make a fabric with the degree of desired firmness vs drape will depend on the item to which the edging is being attached and its use.

And of course, personal preference comes into play here. In fact, remember that word “PLAY”. There’s no right or wrong here. Just what works for YOU.

simple eyelet #2 lace edging

Same thread, same edging pattern, same number of repeats. Just a different needle size. Don't be afraid to "play".

3. The material the knitting needles are made of can make a difference.

Stainless steel vs. aluminum vs. wooden etc. makes a difference. How your stitches slide or grab can affect both your tension and your joy of knitting.

Too slick and you can feel like you are skating on thin ice. Too grabby and it will slow you to a crawl and tire you out too quickly. Like Goldilocks and the 3 Bears, there is a point at which the porridge is ‘just right’. Only you can know that.

If you are going to be working a mile of lace edging, sample and make sure you are comfortable with how the combination of yarn and needles feels while you are working. Fortunately, all of our projects for Bits of Lace will be relatively small, so you can get experience under your belt while still creating some pretty things.


The missing point?

Some of you may have realized I didn’t mention how pointy the knitting needles need to be so they can be used for lace? Well, it just is not something that I require to knit successful lace. This is why: I don’t like to puncture myself or work too hard, lol. I personally feel that if you need to use extra-sharp needles for your lace, you might instead want to consider loosening up your tension. The looser tension also helps you not work so hard and tire your wrists and hands (or worse problems in the long term). But again, this can be a preference that you yourself will have to ultimately decide upon.

The main point of all of this is to have fun. These are just guidelines and suggestions so that you can find your own happy zone for knitting bits of lace.

Posted in Bit-size Tutorials | Tagged | 3 Comments